A Community discussion forum for Halo Custom Edition, Halo 2 Vista, Portal and Halo Machinima
|
| »Forums Index »Halo Custom Edition (Bungie/Gearbox) »Halo CE General Discussion »Higuy's Guide to Single Player Mapping | 
|
| Author | Topic: Higuy's Guide to Single Player Mapping (20 messages, Page 1 of 1) | ||||
| Moderators: Dennis | |||||
|
Higuy Joined: Mar 6, 2007 
@lucasgovatos |
Posted: Jul 11, 2010 07:12 PM
Msg. 1 of 20
To start things off, this is pretty much what the title says, a guide to single player mapping. Most, and I really do mean MOST levels on this website have horrible design flaws, and bad gameplay when coming to single player mapping. Before reading any further, this guide is made for people familiar with HEK, and know something about how to script a encounter or level. In this guide we will go over the map "the Silent Cartographer" and we will examine how it is a great example of a SP level. I would have chosen the level "The Covenant", however I felt everyone can relate to b30 since it is a simple yet fun and creative level. After that, we will then discuss how we can take those tactics, and stick it into our own level. The information in this article is a more of a "Bam in your face" kinda crap, with me spewing out information. Take it in, think about it, and barf it up onto your map. Please. I'd also like to thank il Duce Primo for his insight into taking alot of consideration into helping me become a better mapper in the single player department. Now thats out of the way, lets get into the design of b30. 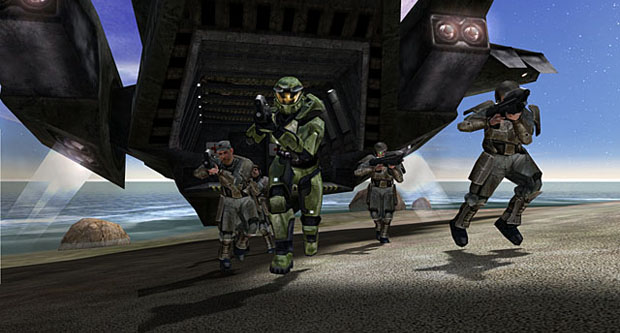 Alright, so why did I choose b30? b30 contains all the things needed for a great and polished level. It has these things:
Now lets look. The map has interesting encounters like I said. Why? The AI placement and behaviors are not the same every single time. We have to think logical here now, the first encounter in the map is the iconic beach assault. Yes, the behavior of the AI here was they were waiting for you, but bungie was able to make this not boring by using music and logical thinking. The music was on a epic scale; the Halo theme. And the logical thinking; the Covenant were waiting, but they weren't prepared. They made it seem more of like a small camp then anything else. Later encounters have the covenant patrolling or sleeping, and you can always enter the encounters in several different ways. Once you get into the main installation, we have the sleeping and patrolling grunts. You can either enter the main room from 3 ways; to bottom doors that go into the main room. You can be spotted easier here. Or, you can take the ramp up to the balcony and circle around and perhaps have a vantage point of taking the encounter out. The environment; inside and out; were both very well done. I don't really mean the art aspect of it, it did look decent. However what I do mean is that the map was built so that the player can see different things to notify something significant in the main objective. One example is the Forerunner structures in the map. Not only do they show where you are in the map, but they also represent a certain part of the map. If you've gone into the main structure where the door is locked, and then go past the outlying security system structure at the beach, Cortana will tell you "Theres the structure.. We should move up the beach to get inside". This tells you what your side objective is. Cortana also implements the hint system here, which helps the player know where to go instead of getting lost. By also expanding the environment, we can also let the player create there own way of playing the game. This is also helps adding more replay experience. You can read more about this at the link below, a nifty little article I found. http://blog.ascendantjustice.com/the-architecture-of-war/the-architecture-of-war-environments/ This level is also pretty decent for Story. It helps you:
It also has little side storys in it.. For example the Marines, and the Pelican. The Pelican crashes on the beach near you, which meshs into gameplay easily. That was done simply by having the lines of the pelican driver ingame and not in a cutscene, and also by delivering ammo and supplies to the player. Same thing goes with the Marines, besides the ammo and supplies. The side objective in the map was to unlock the door to the main shaft.. this is a good example of a side objective since it helps to the greater goal; finding the cartographer. It also helps build some extra immersion to the player, and extra gameplay time for the level. Because of this the player can go a bit deeper into the islands beach, and can also get to fight 2 packs of hunters, and a couple of extra encounters. It also introduces a smaller shaft, and the scene of the ending part of the level. ---> Introducing the parts of the level that player will experience later on is a great way to immerse the player. The player can now think about that certain action that will happen and thus stimulates him. For example in b30, when the player unlocks the door to the main shaft, the "final boss" of the level is shown, the commander elite with the sword. In other games like Half Life 2, this is easily apparent. They show the citadel first thing in the game, and the last time you play it, your on top of the citadel in the heart of city 17. These simple little things help add to the experience the player is given while playing the map. When creating your own level, you first need a floor plan, and somewhat of a story that you can use with your level. This story should have the main objective of the entire level incorporated into it. Take a day to write up the basic actions and events of your story, and write down the dialouge lines in it as well. These should include in game, and cinematic dialouge. Next we need to sit down at a desk with paper and pencil and pretend to be a architect. Draw out the basic layout of your map. You should put down simple things like were ammo should be, certain events take place, where trigger volumes should be, where dialouge lines should play, ETC. Try to cram as much information into it as you can about that certain BSP. Once the drawing of the BSP is complete, next take a look at the first encounter and draw that up. You should always go for uniqgue things. "Filler" encounters are very boring (aka, grunts and a elite in sitting in a hallway waiting for you.. >_>). You must be very specific about the layout, enemy spawns, etc. As your map progress, encounters should get a little harder, or things should get tougher. For example in b30, we had the forerunner shaft. It was a slow encounter down there, and laid back. Easy little music to, etc. And then when you found the cartographer, things speed up. Epic music rolled in, and the encounter got tougher. At the end was the final boss where you pretty much chopped of the head of the encounter basically. From there you were able to run to the encounter and finish the map. Lets look at a simple BSP plan real quick. This is a very old BSP floor plan of Lumoria :  Like I said, this is a BSP floor plan (and its rough too), and not an Encounter floor plan. Encounter floor plans are what there title is; encounter drawings. There more in depth and have more information. Here is an example of a Encounter Floor plan : 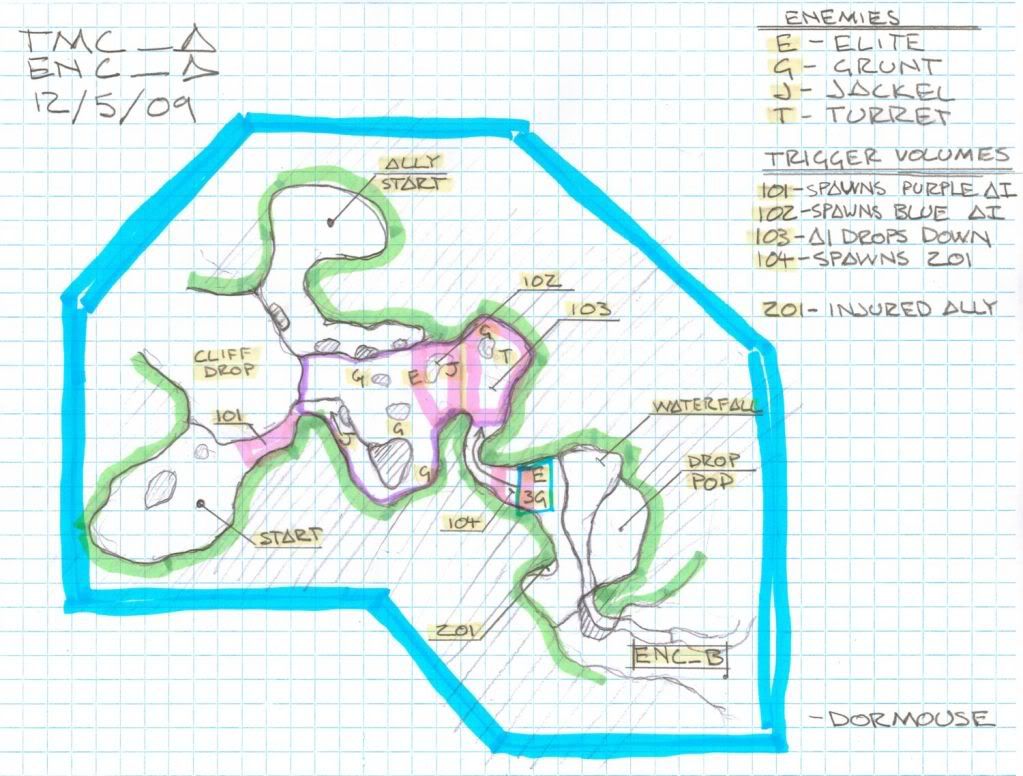 This should be a basis of what your encounter drawing should be. Once you have finalized your encounter drawing, take it into 3ds max, and apply it to a plane. Size it correctly to your biped's scale. Now we want to make a rough of the geometry to that we can take it in game and test it's gameplay, this way we don't have to worry about messing up its art (Because it dosent have any yet, lol!!) . The geometry shouldn't be detailed at all, straight lines up and down for cliffs, not very smooth terrain ( but smooth enough for the encounter to work correctly). If the map is indoors, you can use boxes or other simple objects to layout the interior. OR you can use pre existing meshs, like things from a10 (Human), a50 (Covenant) or b30 (Forerunner). However, if you use pre existing meshs, make sure the gameplay is good before making it look pretty, just like without using them. If you don't use pre existing meshs, I recommend modeling out various forms of the architecture, unwrapping and texturing it, and then putting everything into place and sealing it up. However, will get more into detail into that later. Here is an example of the encounter shown previously as a rough: 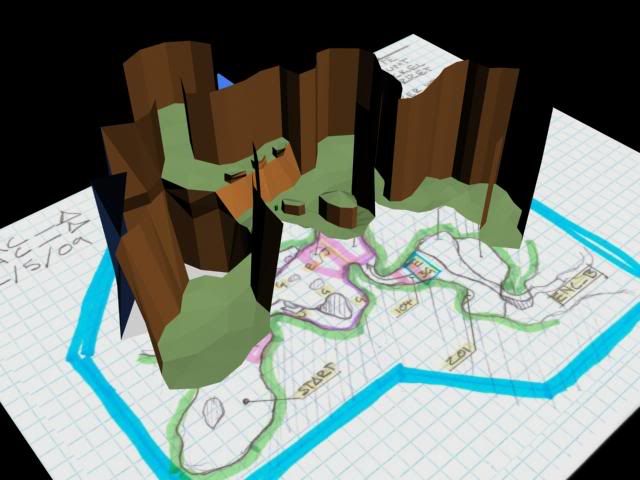 As you can see, there is no detail in this model at all. The map is a rough layout of the single encounter. At this time you should save. However, do save as. You should save backups and a new file every time you do something significant to the map. Example:  Try to keep doing that. Its really helpful if max accidentally corrupt your model like it can do sometimes.. (ugh) Now we want to export the model into a JMS file format, so we can get it into the HEK. Export the map, and run it through tool. Make sure to open the scenario in Guerrilla and add a sky and set the level to single player. Don't worry about starting weapons, we can change that in game (or just change it now if you want). Run some quick lightmaps. Just use 0 0.9 at the end. This will generate them very quickly and they will look bad, however its great at the moment since all were doing is testing gameplay. I will go over lightmaps later on. Now open up to sapien. If your familiar with sapien, you should know by now how to add scenery, and a player starting point. Only add one player starting point obviously, since this is a single player map. And for scenery; don't go into detail. Only add the important scenery that will be interacting with the encounter. Now we want to add the encounter to the level. Remember these things when creating a encounter in sapien :
Balance. When I mean Balance, the encounter should be fair to the player. It shouldn't be frustrating. If this is the first encounter in the level, it should be easy and should introduce things like flanking, types of enemy's, and other similar things. However, it shouldn't introduce everything at once. The next encounter after this can also introduce things. For example, the encounter I've been using introduces stealth tactics, grenades, and flanking. The encounter is also laid back, and easily won. If this was a later encounter, that was the ending to the BSP, I would have one encounter, that was a little hard, and then after that I would have a final boss. Say the encounter was composed of some elites and grunts, and some jackals that can flank you. Once I kill them, or get close to the ending of the BSP, the "final boss" will be released. It could be hunters, or a sword elite with a couple grunts. You should also take into consideration weapons. Weapons play a major role in an encounter. If a player has a weak weapon, that encounter shouldn't be very high scale. However if that player gets a hold of a powerful weapon, you can now throw in a few more enemy's. The flow. The flow is a term I just used to describe how the battle should flow. Its similar to balance somewhat. The flow ties in with your floor plan and how the encounter takes place. If the encounter is meant to be stealthy, you should have multiple ways the enemy can engage you, and multiple ways you can engage the enemy. But if the encounter was, for example, an assault like b30's beach assault, it should be large scale. The enemy's should be getting pushed back; not pushing you back. An assault encounter should be somewhat linear, but it can also use 2 paths. For example, in "the Covenant", a level from halo 3, there is a beach assault similar to b30's. The encounters objective is to destroy an AA wraith so that a pelican can drop down a warthog, the players reward for destroying the encounter. It also ties into the next encounter. But back to the assault; There are two paths. One goes straight across the stream and assaults up to enemy's guarding the wraith. Theres a secondary path that flanks them, giving the player a vantage point. However when the player shoots, nearby enemy's are alerted, and run up the path towards his position. This is a good example of how the flow of that encounter works. The player can have two different experiences. AI placement and Behavior. This has been explained before, but I'll go over it one last time. Depending on what the encounters mood is, the AI's behavior is going to be different. Stealthy = maybe sleeping or patrolling, etc; Assault = Ready for you or his surprised and running to positions. Don't make the enemy's just waiting around the bend for you, make them do something interesting! Firing positions is another thing to do right. Alot of people do them wrong. There pretty simple, but most of the time have to be tweaked later on if not done correctly. Firing potions are what there called; AI go to them when they want to fire. Think of them places that the AI are allowed to go to. You can also set them accordingly to different actions to that squad of AI. The firing positions can be "A B C D... etc" You can then open the squad and say what firing positions are for what; Attacking, defending, etc. Put them on the map where you want the AI to fire.. Don't make to many in the same place or to close to each other. This will cause the AI to run around, be hard to shoot, or something similar. The squad also has something called "initial state" and "return state". Initial state is what the enemy is doing before alerted, and the return state is what there doing after alerted. Command lists are something that can be given to exact enemy spawn locations, or allies as well. They basically tell what that enemy should do. The script can tell them when to advance in the commands list, or they can do it straight from spawn. You can make enemys run to certain vehicles, do certain actions, take, run to places, etc. Don't rely on these to much though, they can be broken easily in the game. Scripting the actions does work a bit better. Once you've taken this all into consideration, place your AI scenery, etc. Everything needed to make the encounter place how it is supposed to. Keep tweaking the encounter until it is exactly how you wanted and it is really fun. Make sure to include music or anything else, however don't worry about cinematic or dialouge lines quite yet. They come later in the polishing stages.
Now that your encounter or entire BSP is a complete rough and is fun to play, with interesting and unique encounters, music, and fun gameplay, its time to spice the level up and make it pretty. Take the lastest max file of the level, and open it up. Depending on what your map is, outdoor, indoor, or both, its going to vary how you should go about putting detail in. With terrain, I personally like to just use the cut tool, cut various lines through the geometry, collapse the vertices it makes together, and then weld move them to the positions I want. Most terrain is smooth and lush, like grass. This goes for snow as well. Rock and cliff are totally the opposite; jagged and sharp, cutting off easily. Rip open the BSP of a30. It is a GREAT example of how a level like that should be polished. It shows how rivers should be done, cliffs, and grass. The modifier, noise, also helps create variation in the cliffs. Same goes with soft selection. Soft selection is known for its use in box maps, but it can also be applied here for hills and smoothing things out. For unwraping the ground, select all the ground faces and use a planar map. You may want to break up the top parts of the map (since they can be lower detail) and make the ones the player will be working on higher detail. I normally use a 1024x1024 or 2048x2048 map for my ground textures. It depends on the size of the map, though. Cliffs should use a texture that goes side to side. I basically just unwrap individual areas of cliff faces , and then align them correctly so the texture goes across it perfectly. Indoor maps are the total opposite. Since you have this rough, boxy layout of the map indoor, you should get the assets your going to be using to put the details in and use them to build it. Basically what I do for these is use old pre existing geometry from Halo's levels ( but if its not designed like that, make your own and then do the following) and the place them into where they should go. Seal them all together and you should be good for detail. Make sure the assets are polished and unwrapped before applying them; it would be frustrating having to go back and UV every single one ;_;'. If you keep applying those rules to your entire level you should be pretty good to go and your level can look really good. Export your map once again, add your final touches of scenery and other effects into the map. Anything that deals with light should be added in now. Make sure to add lights into indoor places of your map. This can be done buy just making a plane, adding the shader name of a light thats stock, and adding ! to the end of the material name in max. If the has the final bsp touches, everything looks perfect, all scenery in place, all lights in place as well, then we are good to go for lightmaps. Lightmaps aren't tricky in Halo. If you've noticed, lightmaps normally pop up these six digit numbers. These show how many times lightmaps have been rendered. Smaller the number, higher the quality. I run most of my small maps at the quality of 1 0.05. Bigger maps are 1 0.08. However, anything past 0.01 dosent really affect and you can't tell a difference. Depending on the maps size, lightmaps cant take a various amount of time. It can take up to about 4 days for the highest quality on the biggest maps (at least on my computer >_>) Cinematics aren't tricky either, but they require thinking and time. Set up the camera points for the cinematic, and then worry about syncing them up with the animations or AI command lists. Syncing the camera though requires lots of tweaking. Here is my idea of how it works (lol, I just mess with the variables until its right)  The camera_set says what camera position to go to. 0 Means an immediate start at that position (Basically, it wont move to the next one, it just starts there). Higher variable means the slower it moves to the next camera, and the sleep makes sure it dosent move fast (its the speed it takes to get the next as well.. idk lol) Basically, mess with the variables until you have something that plays nice. It'll take a little bit of tweaking to sync it. Dialogue lines wont take time to sync up. As long as you have the sound in game and sounds nice, and is set to scripted dialouge line as its type, your good. Find what trigger volume you want it to play at and add the command line : (sound_impulse_start "source-file" none 1) The source file is the exact location of the sound file. Name and everything. Add it under the trigger volume, and your good. The end result of this encounter: 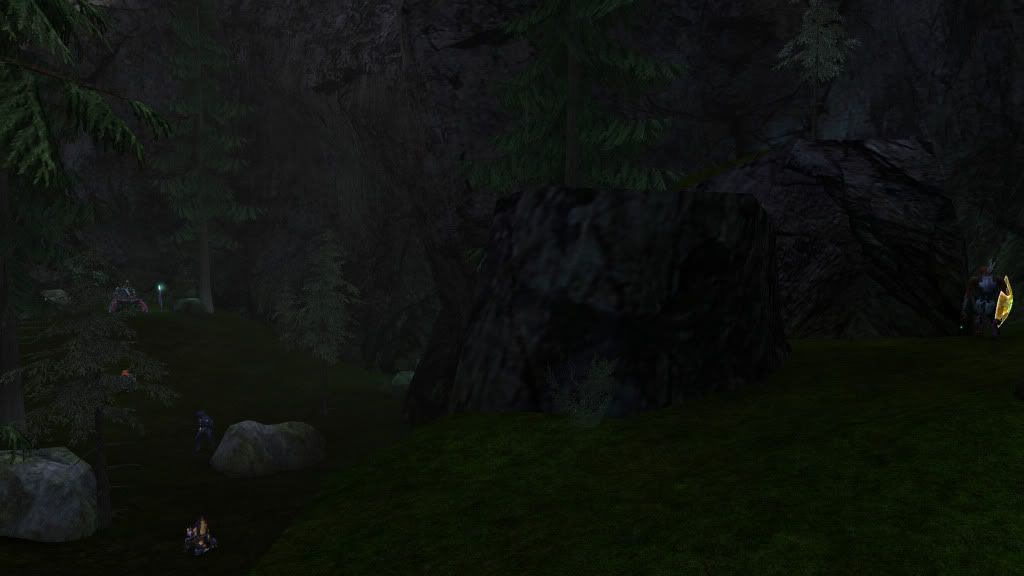 If you follow these guide lines, your end result should be decent. For more information, you can check out 2 of my older tutorials: Encounter making in sapien: http://vimeo.com/12915248 Modeling maps for Halo in 3ds Max: http://vimeo.com/11781231 There is also plenty of resources on this website (Halomaps.org) with tutorials and other tags. The forums is also a good place to ask questions. Most of the people here are nice and help you with your questions. Modacity.net is also another good place for asking questions. If you have any questions, feel fry to PM me or add me on xfire, which is located on my profile. Thanks to the following people: Lodex il Duce Primo or "Dormouse" Rest of TM Mapping Team. Have fun mapping and thanks for reading!!! I hope this was a good insight into Single Player mapping. PS. I wrote all this information in less then 2 days.. If you want to add information or update this, pm me and I'll see if its worth adding into the article. Edited by Higuy on Jul 11, 2010 at 07:14 PM |
||||
|
|
|||||
|
Jesse Joined: Jan 18, 2009 Discord: Holy Crust#4500 |
Posted: Jul 11, 2010 07:14 PM
Msg. 2 of 20
wewt
|
||||
|
|
|||||
|
Delicon20 Joined: Oct 3, 2008 
Still here. Still loves bacon |
Posted: Jul 11, 2010 07:18 PM
Msg. 3 of 20
most people who need this tutorial won't have access to 3ds max, they will only have gmax, so you probably should have used gmax instead of 3ds max
just sayin -_- |
||||
|
|
|||||
|
Higuy Joined: Mar 6, 2007
@lucasgovatos |
Posted: Jul 11, 2010 07:20 PM
Msg. 4 of 20
Quote: --- Original message by: Delicon20 most people who need this tutorial won't have access to 3ds max, they will only have gmax, so you probably should have used gmax instead of 3ds max just sayin -_- Everything I covered in this tutorial Gmax should be able to handle decently. I only used Gmax when I made box maps, but im pretty sure it had all the essential tools to build a map. |
||||
|
|
|||||
|
Spartan_094 Joined: Jan 8, 2008 
|
Posted: Jul 11, 2010 07:23 PM
Msg. 5 of 20
It does. You could draw a 2d birds eye view perspective in MS paint and import it a certain way and make a BSP. Then you can edit it to give it terrain and such. I done it before back awhile back when I had only gmax.
Edited by Spartan_094 on Jul 11, 2010 at 07:24 PM |
||||
|
|
|||||
|
FtDSpartn Joined: May 1, 2009 
Verified AI. |
Posted: Jul 11, 2010 10:32 PM
Msg. 6 of 20
This needs to be stickied.
|
||||
|
|
|||||
|
DarkHalo003 Joined: Mar 10, 2008 
All ARs Need Green Little Buttons. |
Posted: Jul 11, 2010 10:55 PM
Msg. 7 of 20
Too long didn't read, but I like how you're helping out with getting SP stuff moving. You should probably PDF it and upload it to the site.
|
||||
|
|
|||||
|
Hydrogen Joined: Dec 6, 2009 
Wort Wort Wort... |
Posted: Jul 12, 2010 02:35 AM
Msg. 8 of 20
u deserve a medal!!! now next make spirit go to postion and drop off please
|
||||
|
|
|||||
|
MoooseGuy Joined: Aug 10, 2008 
I Approve This Message. |
Posted: Jul 12, 2010 02:40 AM
Msg. 9 of 20
OMG THIS IS AWESOME!!!
I've been looking for a good, understandable tutorial like this. Sticky this Dennis!!! You...sir...are a GOD! |
||||
|
|
|||||
|
ally Joined: Jun 23, 2010 
Aye Ready |
Posted: Jul 12, 2010 02:52 AM
Msg. 10 of 20
that's 1 damn well written and well explained tutorial.
thanks for taking the time to put this together...much appreciated. |
||||
|
|
|||||
|
Advancebo Joined: Jan 14, 2008 
|
Posted: Jul 12, 2010 03:43 AM
Msg. 11 of 20
PDF Downloads
Mediafire:http://www.mediafire.com/?4m5mm2vhtzo AdvNet:http://advance.wmclan.net/hg2spm/Higuy's%20Guide%20to%20Single%20Player%20Mapping.pdf I edited it for grammar. |
||||
|
|
|||||
|
spartin115 Joined: Sep 26, 2009 
|
Posted: Jul 14, 2010 02:42 AM
Msg. 12 of 20
This is one of the best tutorals ever
|
||||
|
|
|||||
|
olly12345 Joined: Jul 30, 2008 
|
Posted: Jul 14, 2010 03:37 AM
Msg. 13 of 20
B30 was actually never meant to be in the campaign, it was a testing bed for bungie. Later added in to help move the storyline along. thats why so much stuff was in it but never used ie: the Banshees and Ghosts.
|
||||
|
|
|||||
|
ThetianSoldier Joined: May 15, 2010 
Keyboard not found! Press any key to continue... |
Posted: Jul 14, 2010 06:00 AM
Msg. 14 of 20
Eerily convenient that you released this just before me finishing my aerial encounters tutorial...
|
||||
|
|
|||||
|
Shade117 pro Joined: Jul 2, 2009 
Yeah bro (xfire: blue117pro) I can make cubemaps |
Posted: Jul 14, 2010 06:47 AM
Msg. 15 of 20
This is great for planning the map to the final stages of making a SP map. This HAS to be stickied because this is a great way to start planning and creating an In-Depth SP map.
|
||||
|
|
|||||
|
032 Mendicant Bias Joined: Feb 25, 2010 
Magnum periculum est elit. |
Posted: Jul 14, 2010 12:01 PM
Msg. 16 of 20
Quote: --- Original message by: Shade117 pro This is great for planning the map to the final stages of making a SP map. This HAS to be stickied because this is a great way to start planning and creating an In-Depth SP map. this Edited by Yoko R on Jul 14, 2010 at 12:01 PM |
||||
|
|
|||||
|
Skyancez3o4 Joined: Apr 6, 2010 
I miss CE |
Posted: Jul 15, 2010 12:15 AM
Msg. 17 of 20
This is a great tutorial, it definitely deservers to be stickied :D
|
||||
|
|
|||||
|
UnevenElefant5 Joined: May 3, 2008 
its been fun yall, i'll never forget this site :') |
Posted: Jul 15, 2010 03:43 AM
Msg. 18 of 20
Finally got around to reading this. Makes me want to completely rework innie, but I don't have the time.
I'll just apply this to my next SP :D |
||||
|
|
|||||
|
DarkHalo003 Joined: Mar 10, 2008
All ARs Need Green Little Buttons. |
Posted: Jul 15, 2010 10:47 AM
Msg. 19 of 20
For design's sake, don't forget to make sure the AI look like they're actually there. In other words, don't place five squads of Covenant in the middle of a plain expecting the player to understand why they're there. If you placed Covenant barricades, crates, batteries, and antenna arrays, it will look a lot more convincing. A good example, of course, is the Silent Cartographer.
|
||||
|
|
|||||
|
Gamma927 Joined: Jun 12, 2008 
Steam: gamma927 |
Posted: Jul 15, 2010 11:12 AM
Msg. 20 of 20
Quote: --- Original message by: UnevenElefant5 Finally got around to reading this. Makes me want to completely rework innie, but I don't have the time. I'll just apply this to my next SP :D You have no deadline, no expectant fans waiting for a release. You have plenty of time. Now go forth and fix the ugly thing up :D slightly kidding. Fix it anyway >:[ |
||||
|
|
|||||

|