A Community discussion forum for Halo Custom Edition, Halo 2 Vista, Portal and Halo Machinima
|
| »Forums Index »Halo Custom Edition (Bungie/Gearbox) »Halo CE Technical / Map Design »Dropship anims | 
|
| Author | Topic: Dropship anims (3 messages, Page 1 of 1) | ||||
| Moderators: Dennis | |||||
|
ally Joined: Jun 23, 2010 
Aye Ready |
Posted: Feb 19, 2012 08:15 AM
Msg. 1 of 3
info from polamee
For the AI driving vehicles: First off, if you want the AI to drive a vehicle it does not have animations for, such as an Elite driving hog, you need it to have animations. The original Elites only have anims for Ghosts, Banshees and Turrets. Next, you would want the AI to get inside the vehicle after spawning it. There are main 2 ways. The first is the command list method, and the second is vehicle_load_magic. There are other methods, however these 2 are the easiest. Personally I like vehicle_load_magic. I made a tutorial on this sometime back. You'll need to know how to script first. Look at my 'further reading' list below to find out tutorials. Quote: Of course, you want your dropship to drop off enemies/allies, so you should use a handy command called vehicle_load_magic First off, you need a named vehicle and an AI squad that you want to get inside the vehicle (this works for any vehicle). Then, type in this for your script sythax: (vehicle_load_magic (ai_actors /)) Note that every vehicle has its own unique seat label for every seat, and you have to check those in Guerilla. For example, if my AI encounter name was �fliers� and squad name was �shee�, and I wanted the AI in the squad �shee� to get into a Banshee driver seat. Name your banshee, �shee�. (vehicle_load_magic flier B-driver (ai_actors fliers/shee)) �..as the seat label is B-driver To get the ppl out of the vehicle, use the vehicle_unload command. - From my tutorial. Further Reading: http://hce.halomaps.org/index.cfm?fid=2298 - Fixing up those vehicles which AI don't drive correctly http://forum.halomaps.org/index.cfm%3Fpage=topic&topicID=22698 - Driving vehicles on command lists. http://hce.halomaps.org/index.cfm?fid=2879 - Getting a script to work. http://hce.halomaps.org/index.cfm?fid=4315 - My tutorial http://hce.halomaps.org/index.cfm?fid=2809 - More scripting commands. Some can be used for AI as well. I made this for some other guy who wanted Elites to drive vehicles. Here comes the command list method (for those who are either too lazy or can't script): 1. Create your AI squad encounter. Say you create an encounter of elites. 2. Go to that little option called 'command list' underneath 'encounters' in the 'AI' option. 3. Once you have selected the Command List option, create a new instance. Name it 'Vehicle' or something similar. 4. Go to the properties tab and tick 'Allow initiative' and 'allow targeting' 4. Open the new instance and select 'Commands'. Create a new command by selecting 'new instance' 5. Go to the properties tab of your new command. 6. Open up all the possible commands ('atom type') 7. Select the 'Vehicle' option. 8. Set which seat you want your AI to get in. I usually prefer 'any seat'. 9. Set the Vehicle distance. I usually prefer 20-70. This is the distance of the vehicles your AI will get in. 10. Go back to your AI encounter. Highlight all the starting positions, or the ones that you want the AI which spawn on to get into vehicles. 11. Go to the properties tab and use your command list. (Changing it from 'none' to whatever your command list is called). 12. Save your map and restart it (in Sapien, of course!) 13. Observe. If you're AI don't get into the vehicles, its beacuse either a. You didn't do the above procedure correctly. b. The Vehicles are too far away or out of reach. c. Its not for their type/they have no animation. Its impossible to get grunts onto Banshees without creating an animation and changing the AI file, for example. d. There are no vehicles. sorry i can't find where the good animations tutorial is that i was looking for. Edited by ally on Feb 19, 2012 at 08:15 AM |
||||
|
|
|||||
|
Maniac1000 -Helpful Poster- Joined: Feb 24, 2007 
|
Posted: Feb 19, 2012 01:24 PM
Msg. 2 of 3
Quote: --- Original message by: The Cereal Killer on halomods I spent quite a long time figuring this out, back in the day. Thought I'd save some trouble for anyone else who wanted to do this. It is based on one aircraft, but the same method could be applied to use another aircraft. This tutorial will show you how you can create yourself a personal guardian angel in the sky. It can be only used in solo player missions (or missions set to multiplayer that you intend for one person to play on), as AI will not sync over networks in Halo 1. Preparing Your Scenario Open your scenario file, then edit the vehicle palette (Note: if you're unsure how to do this, or if you get an error while doing it, see the help section at the bottom). Go to your vehicles section and find an aerial vehicle you want and STOP! Don't you dare click "banshee"! For this to go smoothly, we will need to use the "npelican" gunship, a special version of the pelican from Tiamat's Hugeass. If you don't have it, click here to download it, then copy and paste the tags into your tags folder using the same paths that they came in: http://hce.halomaps....ex.cfm?fid=1220 Do not overwrite files during this transfer. Now then, we still need one on the map. So spawn one up out of sight, facing the direction you want it to be heading when it is flown (make sure it's not too high up in the air, remember vehicle ceilings! If you want to change the vehicle ceiling, see the help section at the bottom). Check the "allowed" boxes for all gametypes (not the "default" boxes, though!) and also check the "not created automatically" box. Now name it "gunship" (of course the name doesn't matter, but that is what the script I provided will be referring to it as). So far you should have something like this: 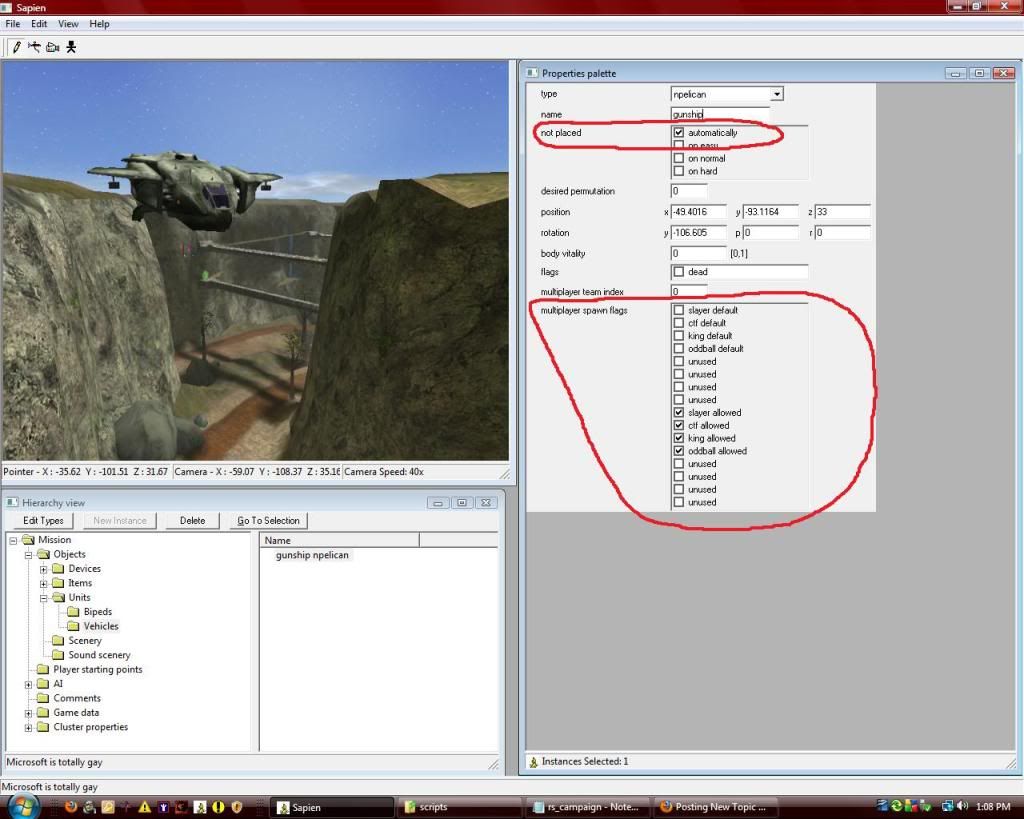 Now we have a ship that can protect you. But who's going to fly it? Create a biped (type doesn't matter, pick your favorite) also somewhere out of sight, name him "pilot", and create another named "gunner", then check the "not created automatically" boxes for both. 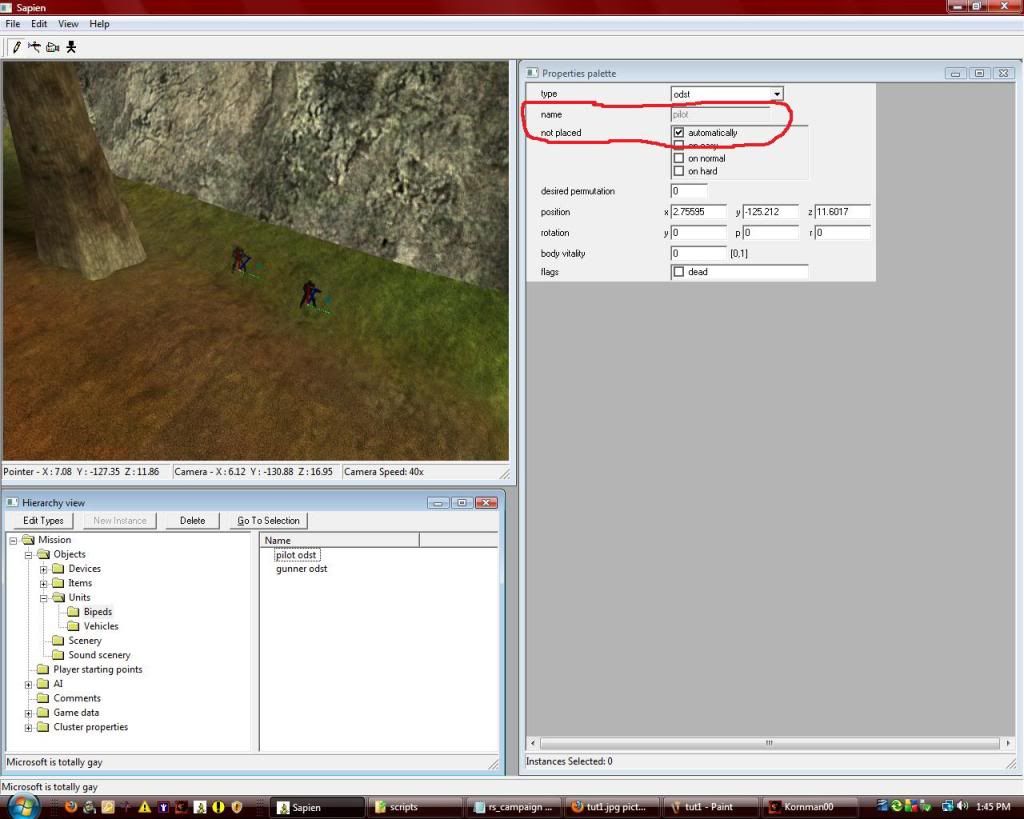 Every good pilot needs a brain. So in hierarchy view, click the ai folder, then the encounter folder, and then click the "new instance" button at the top of that window. Name this encounter "pilot". Now inside the encounter, click squads and then "new instance". Name this squad "pilot" as well, to simplify things. Set the encounter team (if your map is set to multiplayer, 0 is red team and 1 is blue team; if your map is set to solo, 0 means to use the default team specified in the bipeds' tags, 1 is for the player's team, and the rest will all be enemies). At this time, download the following attachment: http://www.cereal-ki...0Mods/pilot.zip It contains special actor and actor_variant tags to be used for (what else?) pilots.Add them to "tags\characters\cyborg". Now go into sapien, click "edit types" and in the dropdown box at the top, find "actor variants". Add the actor variant you just downloaded. Now click done and set the squad "pilot" to that actor type. 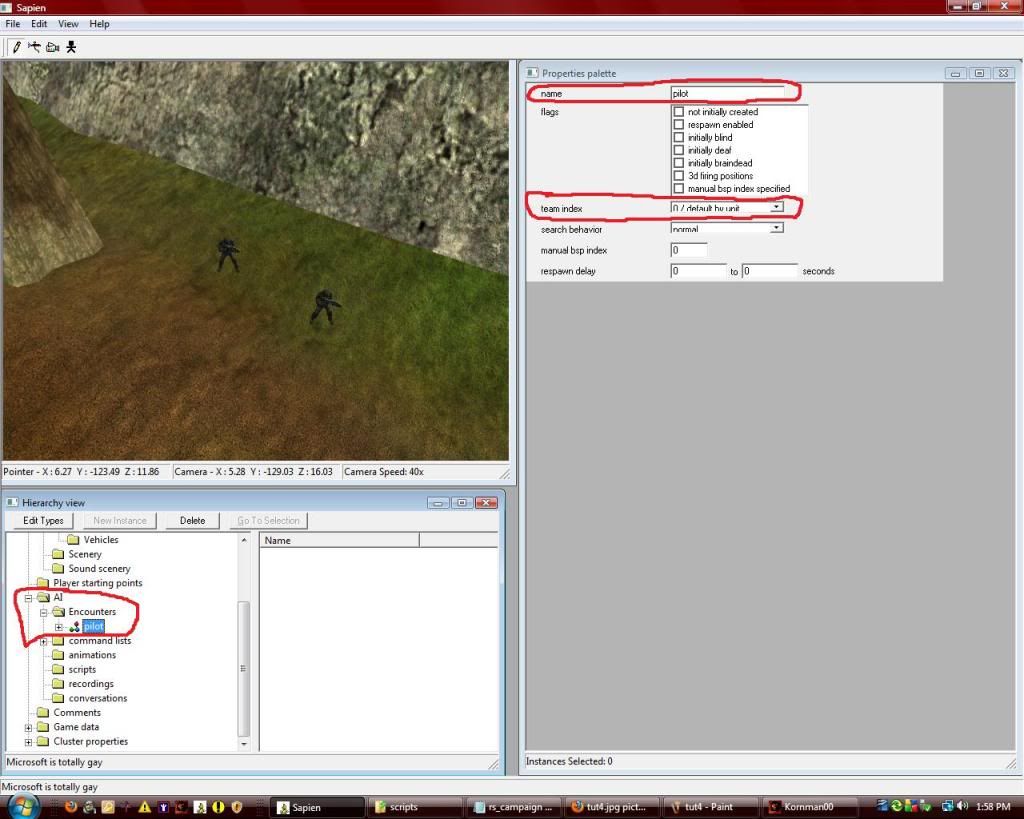 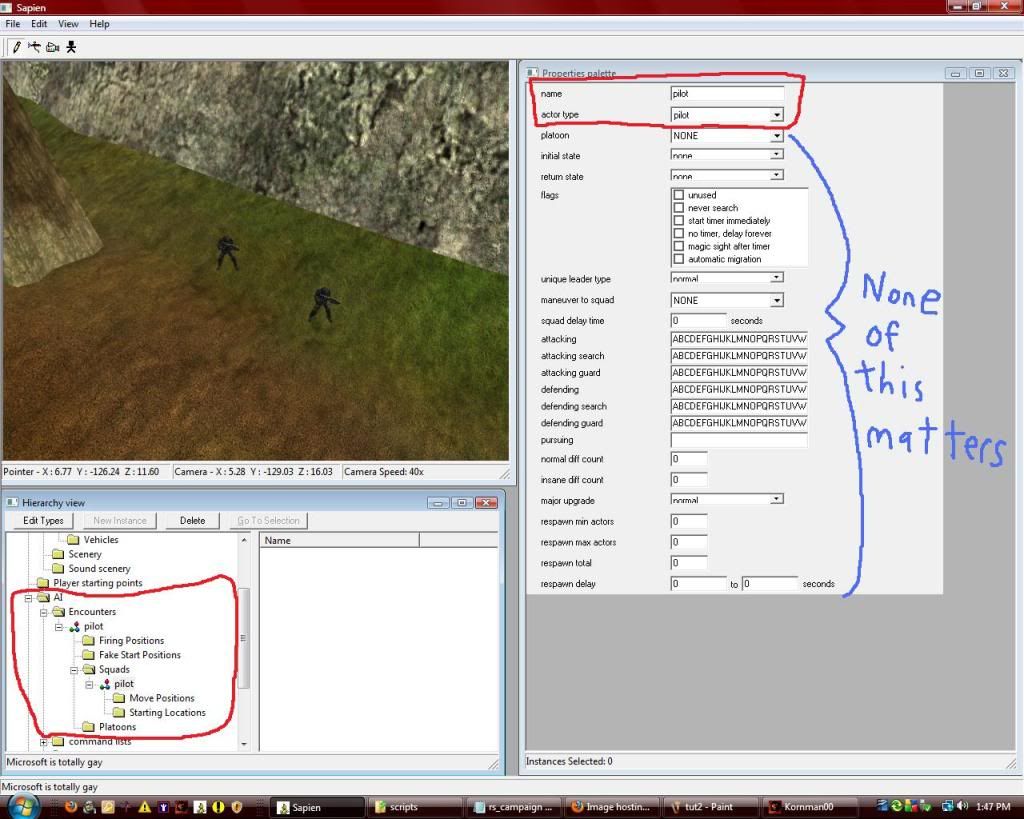 Next, create a command list named "support_path". Click on "command lists" right below encounters and hit "new instance". Two new folders will be underneath it, points and commands. Go to "points" and these work just like objects, right-click in game-view to place a new one, left-click and hold on it to move it around. Place these in a looping path around the map (on the ground, for now). Don't do too many, usually less than 12 works best. Now, go to your vehicle in hierarchy view, and highlight the "z" coordinate. Right-click and copy it, then paste it into the "z" coordinate for all of your points. This will keep them at the same level as your ship. 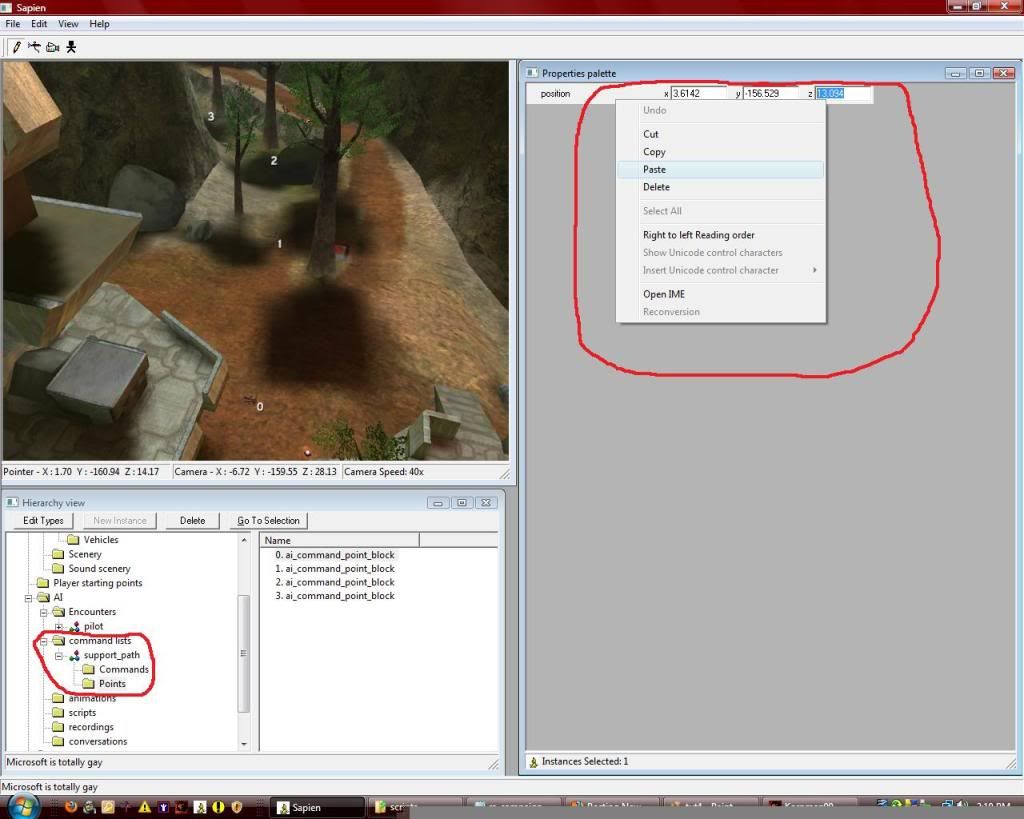 Now go into "commands". Click new instance, then in properties select "go to" in the "atom type" dropdown box. In the destination dropdown box, select your first point. Then hit new instance again and do one for your next point and so on. When you have one for each point, click "new instance" one more time. In atom type, click "loop". For "modifier" put "always" and for "command" click your very first command. 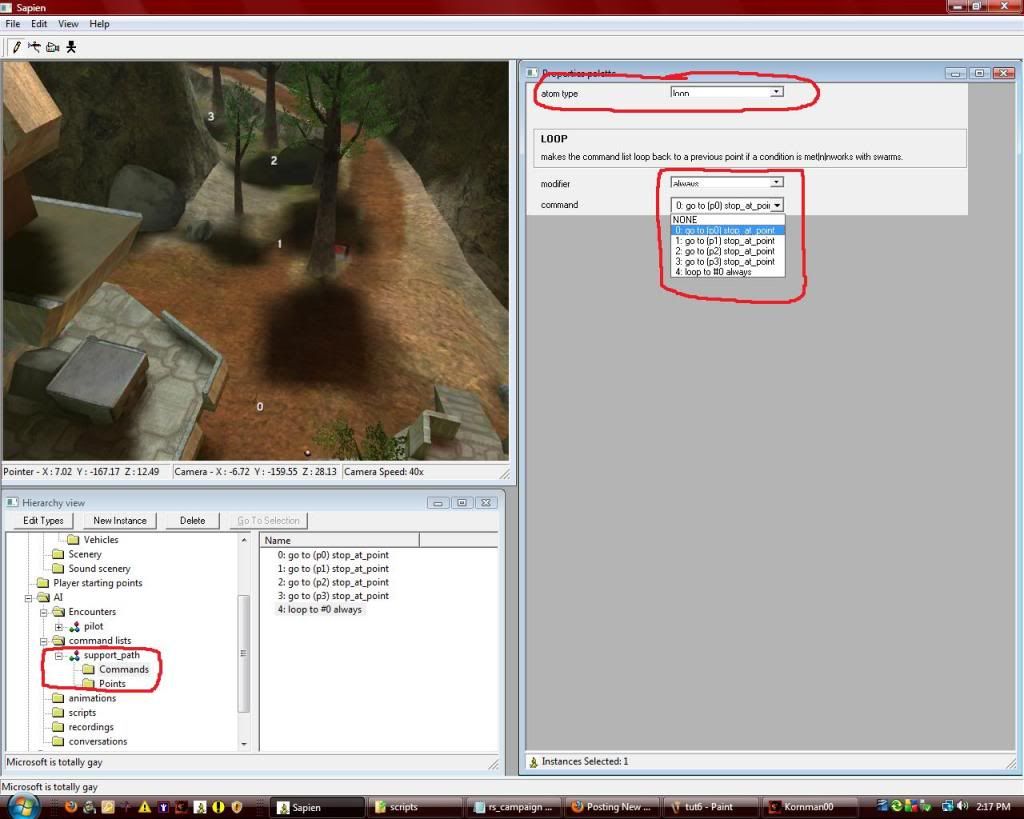 Making Some Necessary Changes in Guerrilla Minimize Sapien and open Guerrilla. In guerrilla open the npelican.vehicle and scroll all the way to the bottom. Go up 6 options from the bottom and you will find "ai throttle maximum". It should be unchanged, but we can't have them zooming around at full speed crashing into random stuff, now can we? Unless you for some reason enjoy watching your hard work fail miserably, set this to .5, that is the safest speed that AI can travel at in a pelican. Then right above it, set "ai steering maximum" to 180. 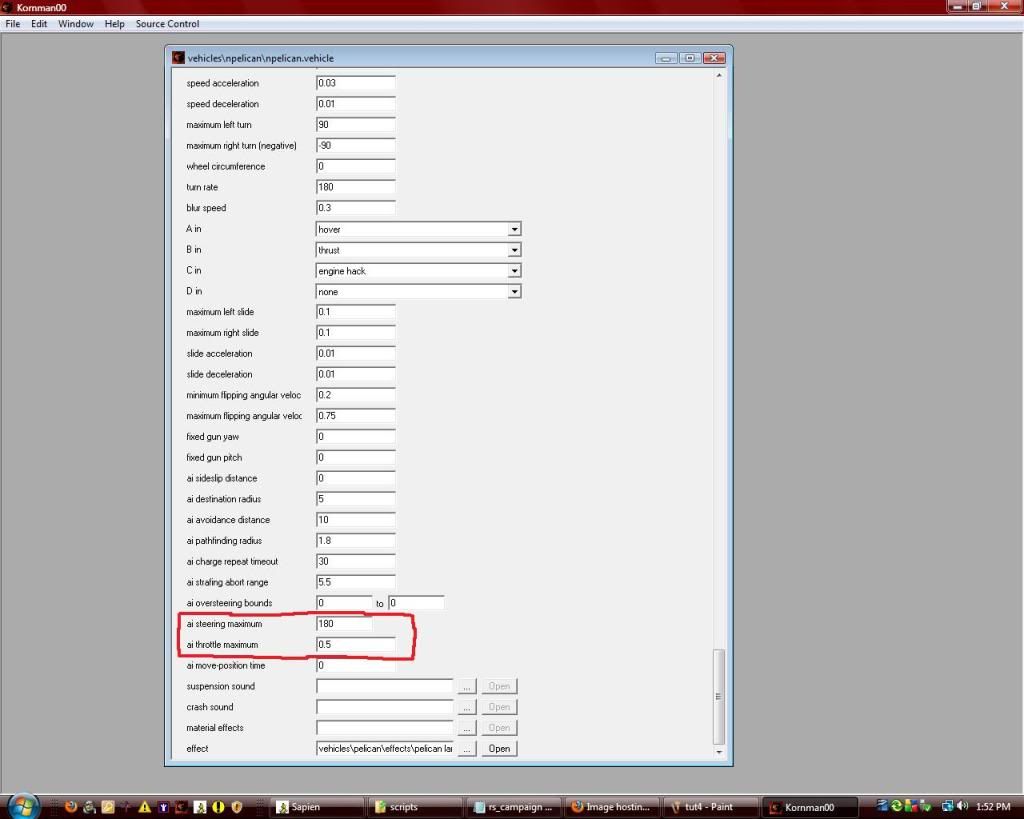 Script Creation and Implementation You've got all the aspects you need. Now you just have to get the two guys into the ship and get them to fly around and shoot. Go to "data\levels\[your map path]\" then add a new folder called "scripts". Inside scripts, make a notepad text file. In the text file, "click file > save as" and name it whatever you want, but the important part is to click "all file types" at the bottom, and then save it as a .hsc file, not a .txt.  Now, be sure you're in the .hsc file. Delete the original text file to avoid confusion. Copy and paste this: (script startup air_support This script will wait until you press flashlight, and when you do BAM! Instant air support! If you'd like it to activate under different conditions, just ask. Save it, then close it. Go back to sapien and click "file > compile scripts". It should say "scripts successfully compiled" if it says something else, comment and post what it told you. Help Section If you want to change the vehicle ceiling, follow these steps: 1. Open your map's bsp in guerrilla (scenario_structure_bsp, it should be in the same folder as the scenario). 2. It might take a while to load. Don't fret, it'll get there eventually! 3. Once it loads, you should see it right there at the top: 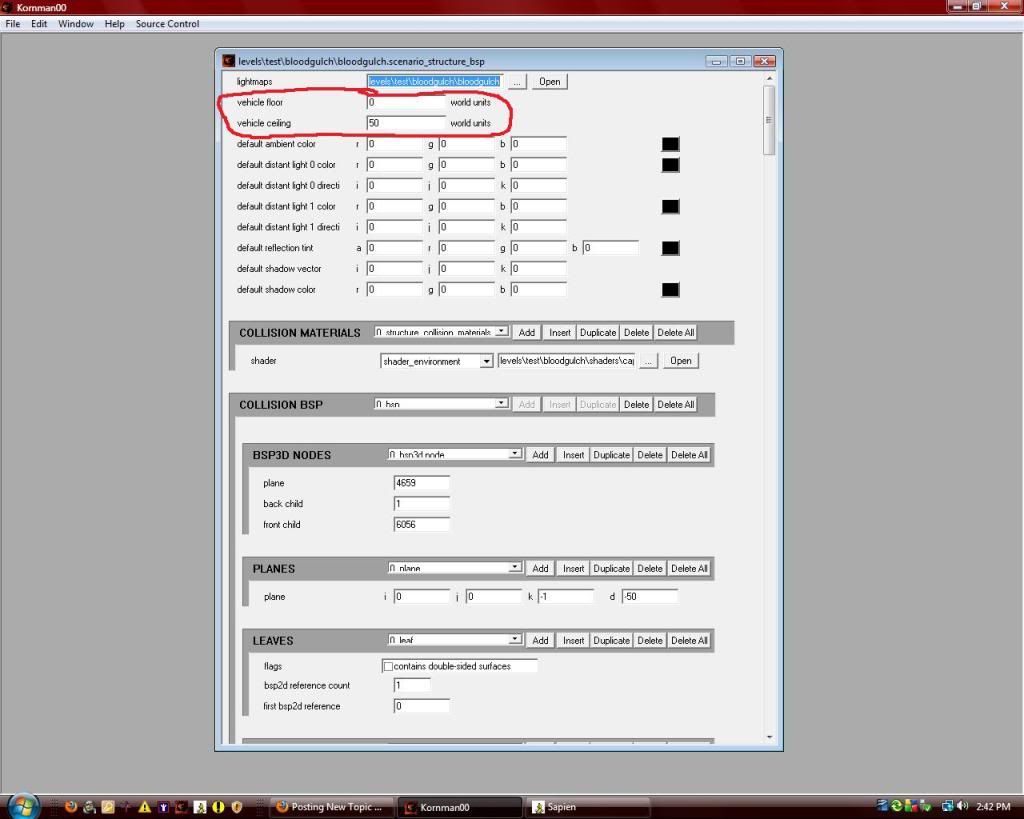 Just raise the ceiling maybe, eh, 20 units if it's giving you problems. Final notes: if you have any more questions, please don't hesitate to comment, even if you think they're dumb. Hope this is enjoyable for you! Don't forget to subscribe and thu- owait. Download the .pdf of this tutorial: http://hce.halomaps....ex.cfm?fid=5847 |
||||
|
|
|||||
|
ally Joined: Jun 23, 2010
Aye Ready |
Posted: Feb 20, 2012 04:38 AM
Msg. 3 of 3
np man, but i only pulled that info from posts by polamee.
|
||||
|
|
|||||

|