A Community discussion forum for Halo Custom Edition, Halo 2 Vista, Portal and Halo Machinima
|
| »Forums Index »Halo Custom Edition (Bungie/Gearbox) »Halo CE General Discussion »[A STEP BY STEP TUTORIAL] How to set up project_yelo & PP in OpenSauce | 
|
| Author | Topic: [A STEP BY STEP TUTORIAL] How to set up project_yelo & PP in OpenSauce (23 messages, Page 1 of 1) | ||||
| Moderators: Dennis | |||||
|
Nickster5000 Joined: Dec 11, 2010 
|
Posted: Jan 21, 2012 12:03 AM
Msg. 1 of 23
Alright, let's get started.
Firstly, we have our blank scenario: 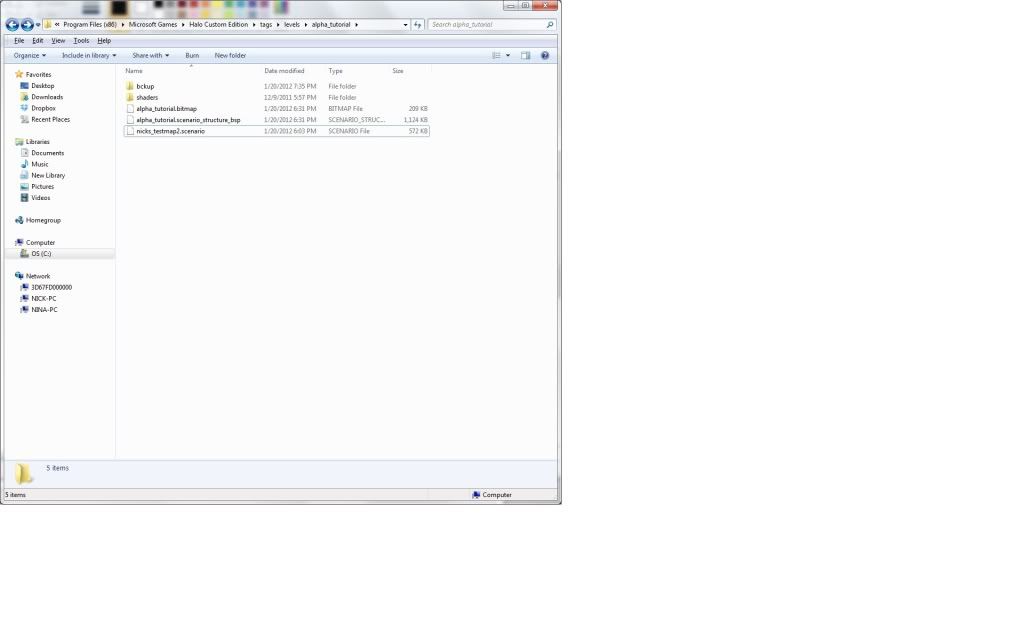 -A BSP file -Scenario -A sky set -Bitmap -Whatever else you need. Now, here is the new objects you will be experimenting with: .effect_postprocess_collection .project_yellow .project_yellow_globals .tag_collection In guerilla, click file>new>project_yellow  If you experiment in here, there is some things you can edit (As far as I know) but we do not need to experiment to add post proccessing, so save it.   To keep it organized, I recommend you save it as: "MapName-Extension" in your levels folder. Now, create a "Project_yellow_globals" file  You can do some more experimenting in here, but we're going for the PP. Save this now.  I recommend you save it as "MapName-Globals" in your levels folder. Now, your going to hook the "Project_yellow_globals" into the "Project_yellow" file. Click the 3 ... next to the "yelo globals" in the file "Project_yellow" file. 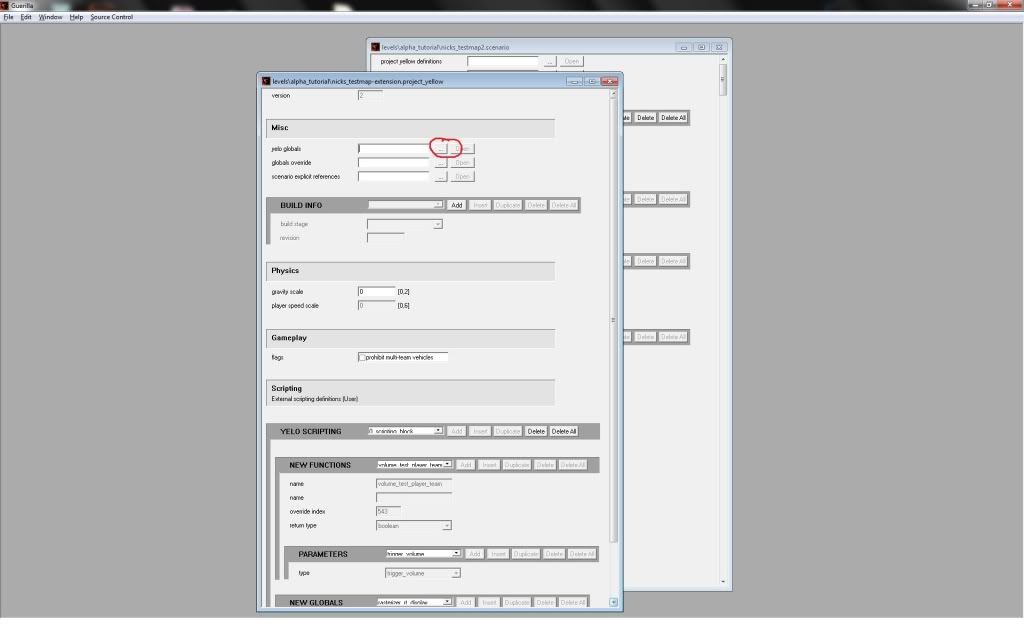 Navagte to where you saved the globals, then click it. It should hook in now.  Now your extension should be all set up. There is alot of feautures located in these 2 files, so feel free to experiment. NOW onto setting up the visual effects OpenSauce 3.0 comes with. Step 1: Start by clicking file>new>effects_postprocess_collection  Step 2: Now click ADD(1) Step 3: then the three dots(2). (Refer to the picture below for steps 2 & 3)  Step 4:Navagate to this folder: tags>postprocess>effects. Step 5: Click "Visr example.effect_postprocess_generic"  Now repeat steps 2-4, but this time, click on "sepia blue example.effect_postprocess_generic" It should look like this now: 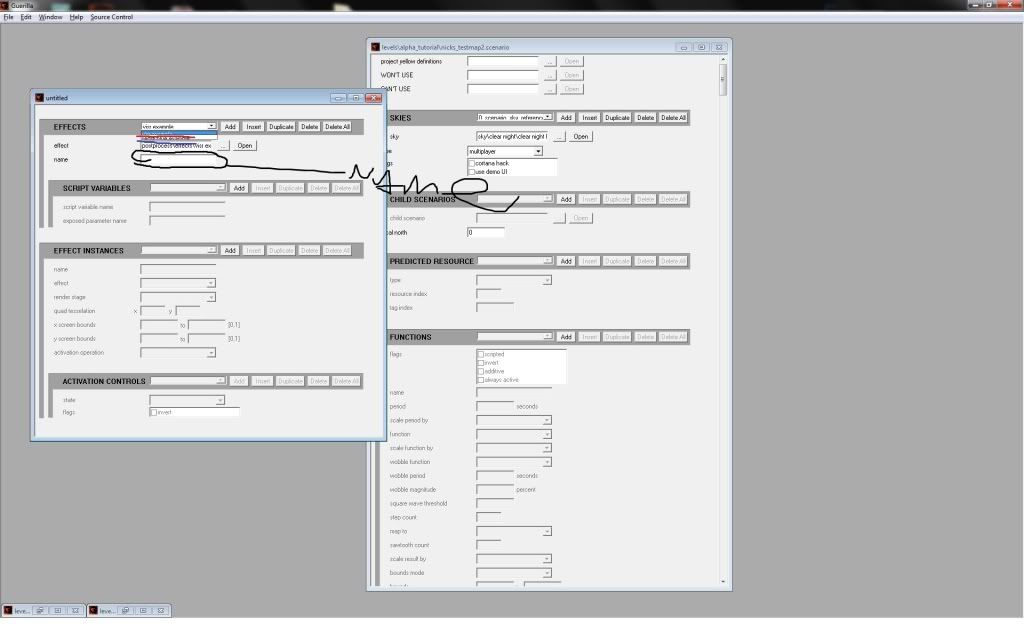 If you can't see it well, there's 2 different effects now. Select each one, and name them whatever you want in the "Name" section. Almost there! hang in there guys! Now, in "Effect instances, click "Add" TWICE! One for the VISR, and one for the sepia blue. Now, this is really important. It starts with 0,1, going to how many effects you have. Since we have added VISR in first, and sepia second, it thinks like this now: 0 - VISR 1 - sepia Let's say we added in 3 new effects, the third one would be "green" the fourth one would be "red" and the fifth one would be "brown". How would it think then? Like this: 0 - VISR 1 - sepia 2 - green 3 - red 4 - brown Now, those effects dont exist, I just made that example so you can understand how it works. Now, back to it's original thinking pattern: 0 - VISR 1 - sepia Under effects instances, name the first one in order VISR, and the second one in order sepia(1), and then change the effects to match what you named them(2). I have no idea what the "Render stage" is (KIRBY DEFINE THESE FOR ME! :D) so I just normally set it to the third option (after alpha'd faces - before hud)(3) (I color coded it so even altheros can understand it! :D) 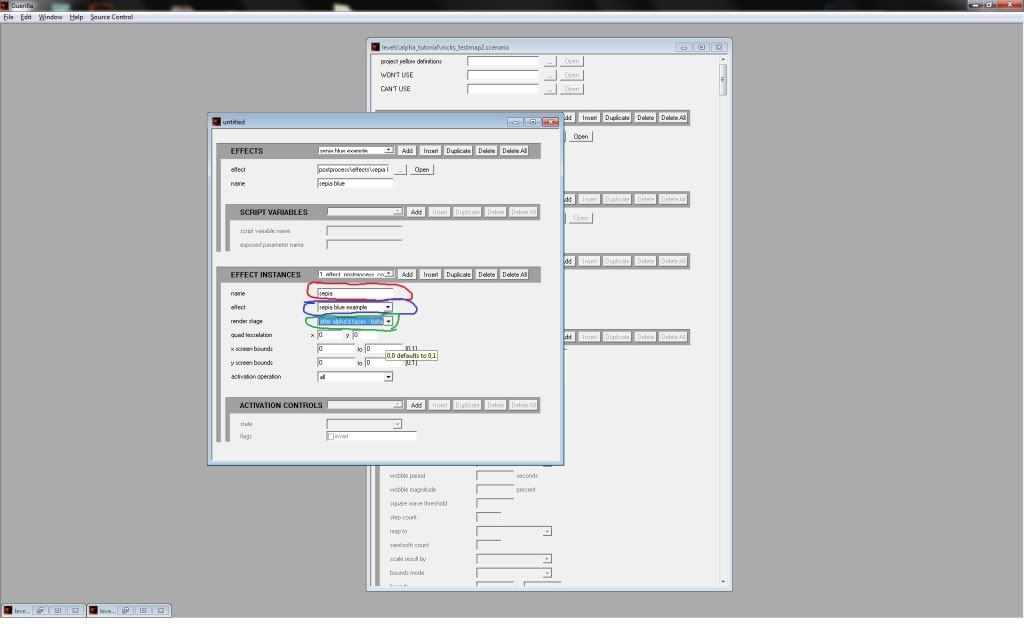 Now save your tag as "MapName - pp"  Now finally, click file>new>tag_collection  Now click "add" and then navagate to your "effects_postprocess_collection" tag you JUST made by clicking the 3 ... (Mapname-pp) 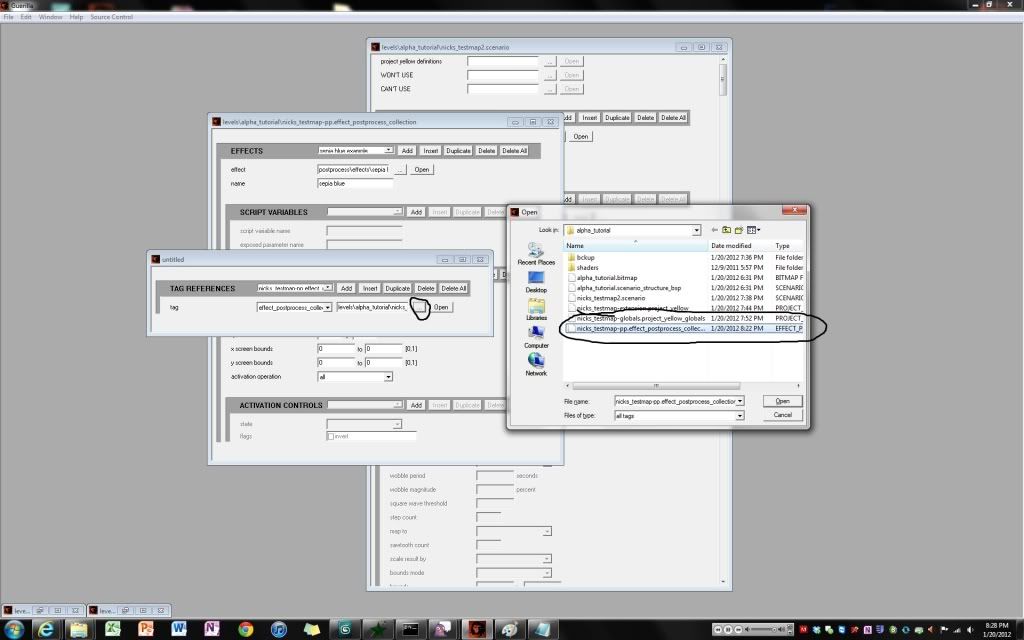 Now save your tag collection as "MapName - tagcollection" in your level's folder.  Now you have to hook it into your "Project Yellow" file, and then hook that into your scenario, then your ready for compiling. Open your "Project Yellow" file. 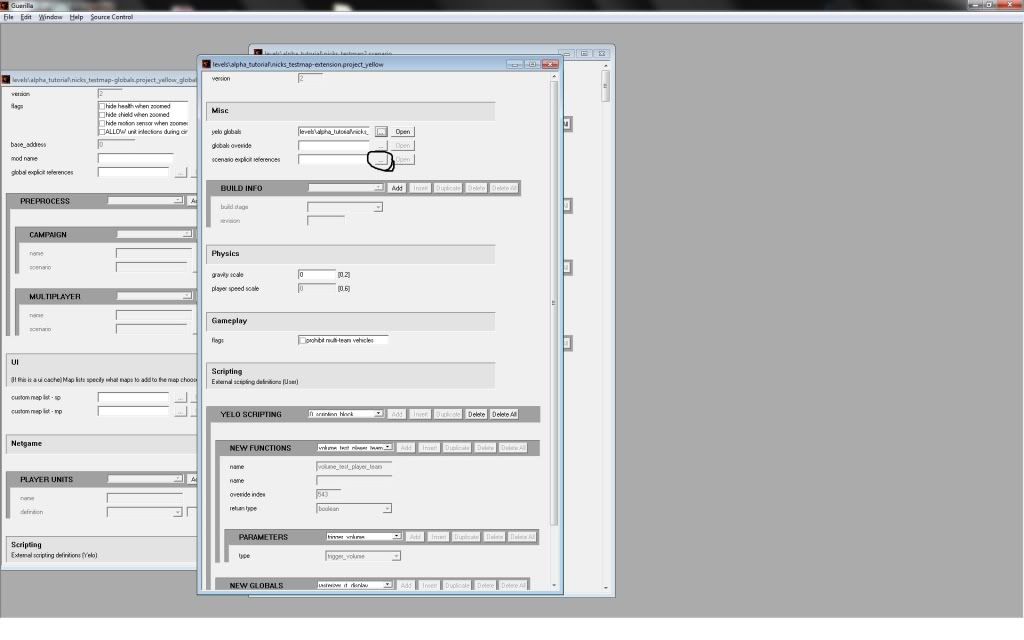 Click the 3 ... next to "Scenario explict refrences", and navagate to your "MapName - tagcollection file. It should look like this now: 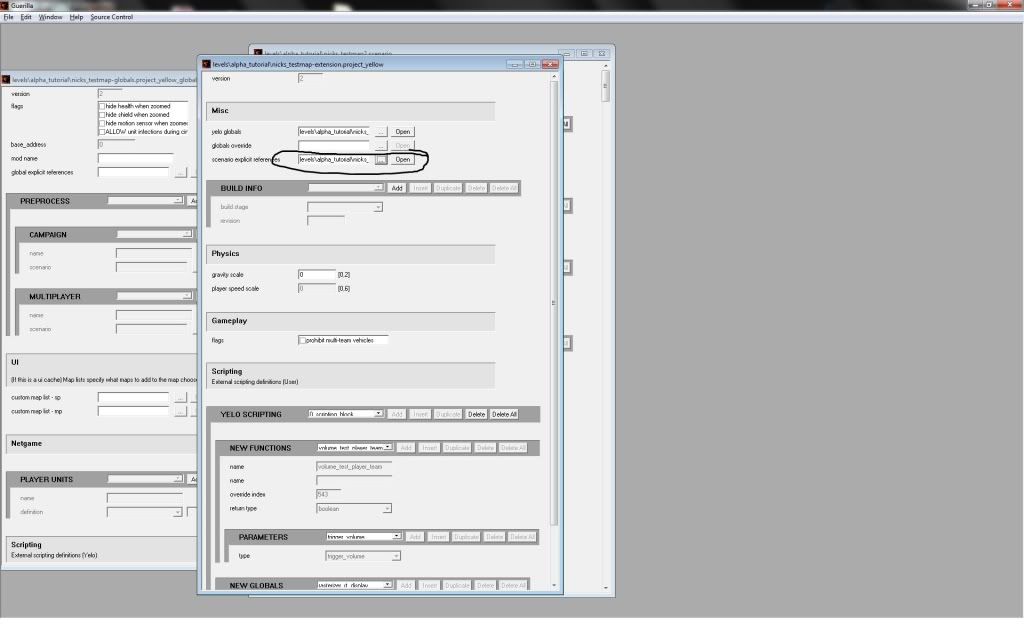 Now open your original scenario file, 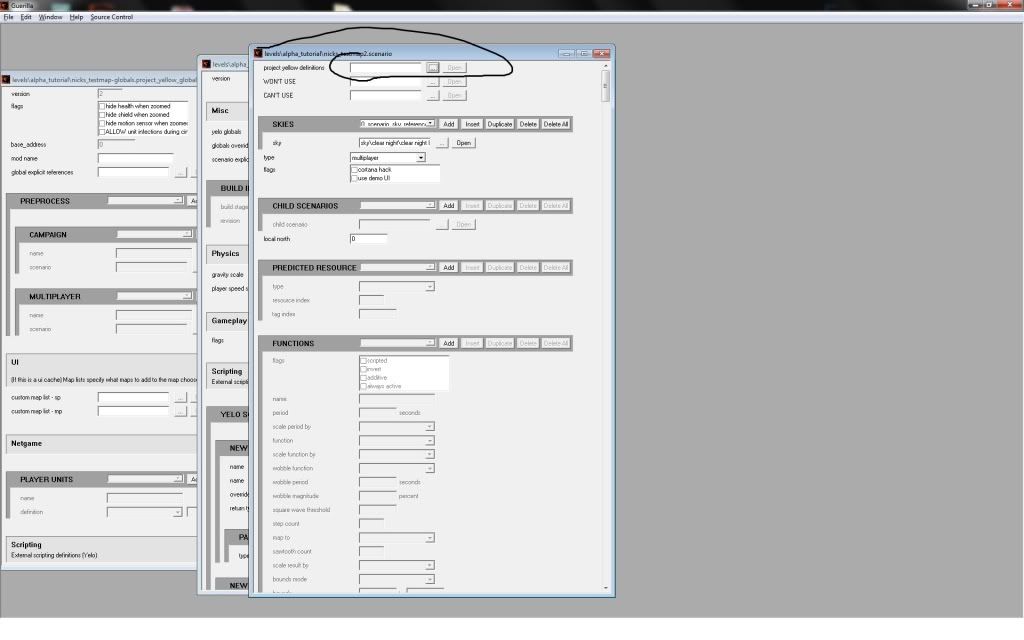 and up top where it says "project yellow defintions", navagate to your "Project Yellow" file.  Click file>save all. Populate how you want it, but now it's compiling time. Open tool, and type: os_tool build-cache-file-ex MapName true true true {Navagation} Ex: C:\Program Files (x86)\Microsoft Games\Halo Custom Edition>os_tool build-cache-f ile-ex nicks_testmap2 true true true levels\alpha_tutorial\nicks_testmap2 What each function means:  1 - modname (mapname) 2 - first true (idk what it does) 3 - second true (idk what it does) 4 - third true (compiles over the map limit) 5 - directory Hit enter, and it'll compile as a .yelo file with a data_files w/ 3 maps in it. Now load CE, and both PP effects should be on. How to turn them off: Remember how it thinks? 0 - VISR 1 - sepia pp_set_effect_instance_active is the command that toggles post processing. pp_set_effect_instance_active 0 0 turns off VISR pp_set_effect_instance_active 0 1 turns VISR on. pp_set_effect_instance_active 1 0 turns sepia off pp_set_effect_instance_active 1 1 turns sepia on. See a pattern? The first number is the effect your identifying, and the second number is the on/off value, 0 turning it off, 1 turning it on. Congratulations, you've set up your first OS supported map! And I wasted 2 hours of my life making this to you, so please dont troll, and point out mistakes I made in a legit way. ((Troll, and you'll get the cinder blocks on you much like my friend R93.)) Also, sorry for the bad quality in the pictures. I hope this helps! --ODST_Nick NOTE: The following Flood Infection tutorial does not work with Opensauce 4.0. Edited 8-14-2015 Edit: The flood infection tutorial. Firstly, open up os_guerilla. Open your "project yellow globals" file and scroll down to "Unit infections" Match your settings to like this:  1 - When you click add, your enabling "unit infections" into your map. 2 - This is the area where you adjust your infection forms. These units will be able to infect the other units you set. 3 - Navagate to your flood infection forms. You may add multiple units that can infect. 4 - Add your units that will be able to become infected. 5 - Infection form: Set this to your infectible unit. Unit: Navagate to your unit that will be able to become infected & have his brains eaten alive. 6. Health thresold: DO NOT MAKE IT 0. It needs to be above 0. (So I used 0.1 :3) 7. This is the area where you edit what your unit will become. So basically, Label 4 is the current unit, and when he gets bitten by the infection forms, and has a health threshold of 0.1, then he will become what you set in label 7's parameter. 8. This is the effect of him turning into a monster to eat your brains next. Kirby told me to make a copy of the effect that I used in this demonstration, because the effect I use causes damage & could kill the flood form he is turning into. Hope this helps! Edited by ODST_Nick on Jan 21, 2012 at 09:06 PM Edited by Nickster5000 on Aug 14, 2015 at 11:10 PM |
||||
|
|
|||||
|
R93_Sniper Joined: Feb 13, 2011 
When in Doubt, RUN! |
Posted: Jan 21, 2012 12:07 AM
Msg. 2 of 23
You lie, you never dropped cinder blocks on me >.<
|
||||
|
|
|||||
|
Nickster5000 Joined: Dec 11, 2010
|
Posted: Jan 21, 2012 12:08 AM
Msg. 3 of 23
Quote: --- Original message by: R93_Sniper You lie, you never dropped cinder blocks on me >.< You're right.... I twisted your neck, then I tied the cinder blocks to your arms and legs, and then threw you off the bridge, REMEMBER? |
||||
|
|
|||||
|
R93_Sniper Joined: Feb 13, 2011
When in Doubt, RUN! |
Posted: Jan 21, 2012 12:10 AM
Msg. 4 of 23
but i survived, thats all that matters now.....
Also, get your definitions before writing a tutorial lol, if im not mistaken, the 3 true/false things are also on the official documentation with their definitions too Also, you can script OS to overlay an effect with an existing key, IE add VISR to flashlight Edited by R93_Sniper on Jan 21, 2012 at 12:13 AM |
||||
|
|
|||||
|
Nickster5000 Joined: Dec 11, 2010
|
Posted: Jan 21, 2012 12:11 AM
Msg. 5 of 23
I thought people who were reading this would actually be smart enough to do that for themselves.
|
||||
|
|
|||||
|
ally Joined: Jun 23, 2010 
Aye Ready |
Posted: Jan 21, 2012 06:10 AM
Msg. 6 of 23
cheers for the quick run through on this nick.
|
||||
|
|
|||||
|
kornman00 Joined: Jul 15, 2010 
|
Posted: Jan 21, 2012 07:14 AM
Msg. 7 of 23
I don't have time to comment on the entire tutorial but I do want to make one thing perfectly clear
build-cache-file-ex's mod-name parameter != the map/scenario-name. Using custom data-files should ONLY ever be done with finalized content for mods which will contain multiple map releases (SP and/or MP and/or UI). Good example: CMT's work. While I'm not sure if they made asset changes in between each MP map release, they would have setup their mod's project_yellow_globals to be associated with "cmt_v2" as a mod name, and then also use that name when running bcf-ex. DO NOT USE mod-sets (custom data-files) for one-time maps. And especially DO NOT USE mod-sets for unfinished content. |
||||
|
|
|||||
|
Jaz Joined: Mar 21, 2010 
[Insert sarcastic comment here] |
Posted: Jan 21, 2012 08:05 AM
Msg. 8 of 23
Needs start results and end results. ;)
Otherwise, nice tutorial. |
||||
|
|
|||||
|
kirby_422 Joined: Jan 22, 2006 
Apparently public enemy number 1? |
Posted: Jan 21, 2012 11:16 AM
Msg. 9 of 23
in your script list, I'd suggest pp_set_effect_instance_fade
That way, instead of turning straight on or off, it fades. Also, I normally leave them as active all the time, and simply fade them between visible and not. eg, pp_set_effect_instance_fade 0 1 0 0.3 This will take a 3rd of a second, to fade from fully on to fully off, for PP index 0. (you can make it fade to 50%, it doesn't care what you fade it to) |
||||
|
|
|||||
|
R93_Sniper Joined: Feb 13, 2011
When in Doubt, RUN! |
Posted: Jan 21, 2012 04:15 PM
Msg. 10 of 23
Quote: --- Original message by: kornman00 DO NOT USE mod-sets (custom data-files) for one-time maps. And especially DO NOT USE mod-sets for unfinished content. Is there any specific reason as for doing this? i know it could end up creating a lot of files but still |
||||
|
|
|||||
|
shadowslayer123 Joined: Feb 22, 2009 
Not the american average |
Posted: Jan 21, 2012 08:15 PM
Msg. 11 of 23
good tutorial, i made it just like you did and everything turned out good. now if only there was a tutorial for making bumps and speculars work.. when i try, nothing happens
|
||||
|
|
|||||
|
YoGamerProductionz Joined: Dec 21, 2011 
I'm back and a noob at modding :( |
Posted: Jan 21, 2012 08:24 PM
Msg. 12 of 23
Nevermind.
Edited by YoGamerProductionz on Jan 21, 2012 at 08:29 PM |
||||
|
|
|||||
|
Nickster5000 Joined: Dec 11, 2010
|
Posted: Jan 21, 2012 08:38 PM
Msg. 13 of 23
Quote: --- Original message by: shadowslayer123 good tutorial, i made it just like you did and everything turned out good. now if only there was a tutorial for making bumps and speculars work.. when i try, nothing happens Too bad I haven't gotten that far. Anyone need a flood infection tutorial now? |
||||
|
|
|||||
|
shadowslayer123 Joined: Feb 22, 2009
Not the american average |
Posted: Jan 21, 2012 09:05 PM
Msg. 14 of 23
that would be fun to play with, if you have the time to make it
|
||||
|
|
|||||
|
Nickster5000 Joined: Dec 11, 2010
|
Posted: Jan 21, 2012 09:07 PM
Msg. 15 of 23
Flood infection tutorial:
Edit: The flood infection tutorial. Firstly, open up os_guerilla. Open your "project yellow globals" file and scroll down to "Unit infections" Match your settings to like this: 1 - When you click add, your enabling "unit infections" into your map. 2 - This is the area where you adjust your infection forms. These units will be able to infect the other units you set. 3 - Navagate to your flood infection forms. You may add multiple units that can infect. 4 - Add your units that will be able to become infected. 5 - Infection form: Set this to your infectible unit. Unit: Navagate to your unit that will be able to become infected & have his brains eaten alive. 6. Health thresold: DO NOT MAKE IT 0. It needs to be above 0. (So I used 0.1 :3) 7. This is the area where you edit what your unit will become. So basically, Label 4 is the current unit, and when he gets bitten by the infection forms, and has a health threshold of 0.1, then he will become what you set in label 7's parameter. 8. This is the effect of him turning into a monster to eat your brains next. Kirby told me to make a copy of the effect that I used in this demonstration, because the effect I use causes damage & could kill the flood form he is turning into. Hope this helps! Also added to the main post! |
||||
|
|
|||||
|
game user10 Joined: Dec 9, 2011 
Who is the Overseer? |
Posted: Jan 25, 2012 06:42 AM
Msg. 16 of 23
Got infections working on OpenSauce's release lol. But yeah this is a useful tutorial.
|
||||
|
|
|||||
|
Choking Victim Joined: Jan 13, 2008 |
Posted: Jan 25, 2012 10:46 AM
Msg. 17 of 23
Don't forget that there are also new 3rd person animation states for unit infections. These are located in the model_animations tag of course. The unit will play the specified animation when it's infection threshold is reached, then the unit will become infected after the animation has finished playing. I'm excited to see what everyone comes up with.
|
||||
|
|
|||||
|
DarkLord0912 Joined: Jan 17, 2009 
Works on bigger and better things |
Posted: Jan 25, 2012 04:43 PM
Msg. 18 of 23
Quote: --- Original message by: shadowslayer123 good tutorial, i made it just like you did and everything turned out good. now if only there was a tutorial for making bumps and speculars work.. when i try, nothing happens Do explain more. When you add spec maps and normal maps R,G,B nothin happens? Did you set it's coefficent to 1 not 0? |
||||
|
|
|||||
|
shadowslayer123 Joined: Feb 22, 2009
Not the american average |
Posted: Jan 25, 2012 05:41 PM
Msg. 19 of 23
id hate to off topic this thread, ill pm you some screenshots of what i did and what it looks like ingame, to keep it clean in here
|
||||
|
|
|||||
|
Nickster5000 Joined: Dec 11, 2010
|
Posted: Jan 25, 2012 08:48 PM
Msg. 20 of 23
Quote: --- Original message by: shadowslayer123 id hate to off topic this thread, ill pm you some screenshots of what i did and what it looks like ingame, to keep it clean in here If you're refering to me being angry, I dont mind if you post pictures of your content in this thread. |
||||
|
|
|||||
|
ChBgt909 Joined: Sep 10, 2011 
ᶘ ᵒᴥᵒᶅ |
Posted: Jan 27, 2012 05:42 AM
Msg. 21 of 23
thx :D
|
||||
|
|
|||||
|
ChBgt909 Joined: Sep 10, 2011
ᶘ ᵒᴥᵒᶅ |
Posted: Jan 27, 2012 08:00 AM
Msg. 22 of 23
wow i rly want to make a yelo version of the map i'm making but i don't want to mess something up lol
|
||||
|
|
|||||
|
Nickster5000 Joined: Dec 11, 2010
|
Posted: Jan 30, 2012 08:48 PM
Msg. 23 of 23
Quote: --- Original message by: ChBgt909 wow i rly want to make a yelo version of the map i'm making but i don't want to mess something up lol Just use the memory upgrade if you need it like waffles said. and if worst comes to worst, just finish your map in regular sapien, and then make a copy. Edit the copy in OS sapien, and name it something different. |
||||
|
|
|||||

|